Published October 2, 2023 08:13AM
Best Southwest National Park Photography Itinerary for Bryce Canyon, Zion and Grand Canyon
From sunrise to sunset to the Milky Way, capture incredible photos of Utah and Arizona’s national parks.
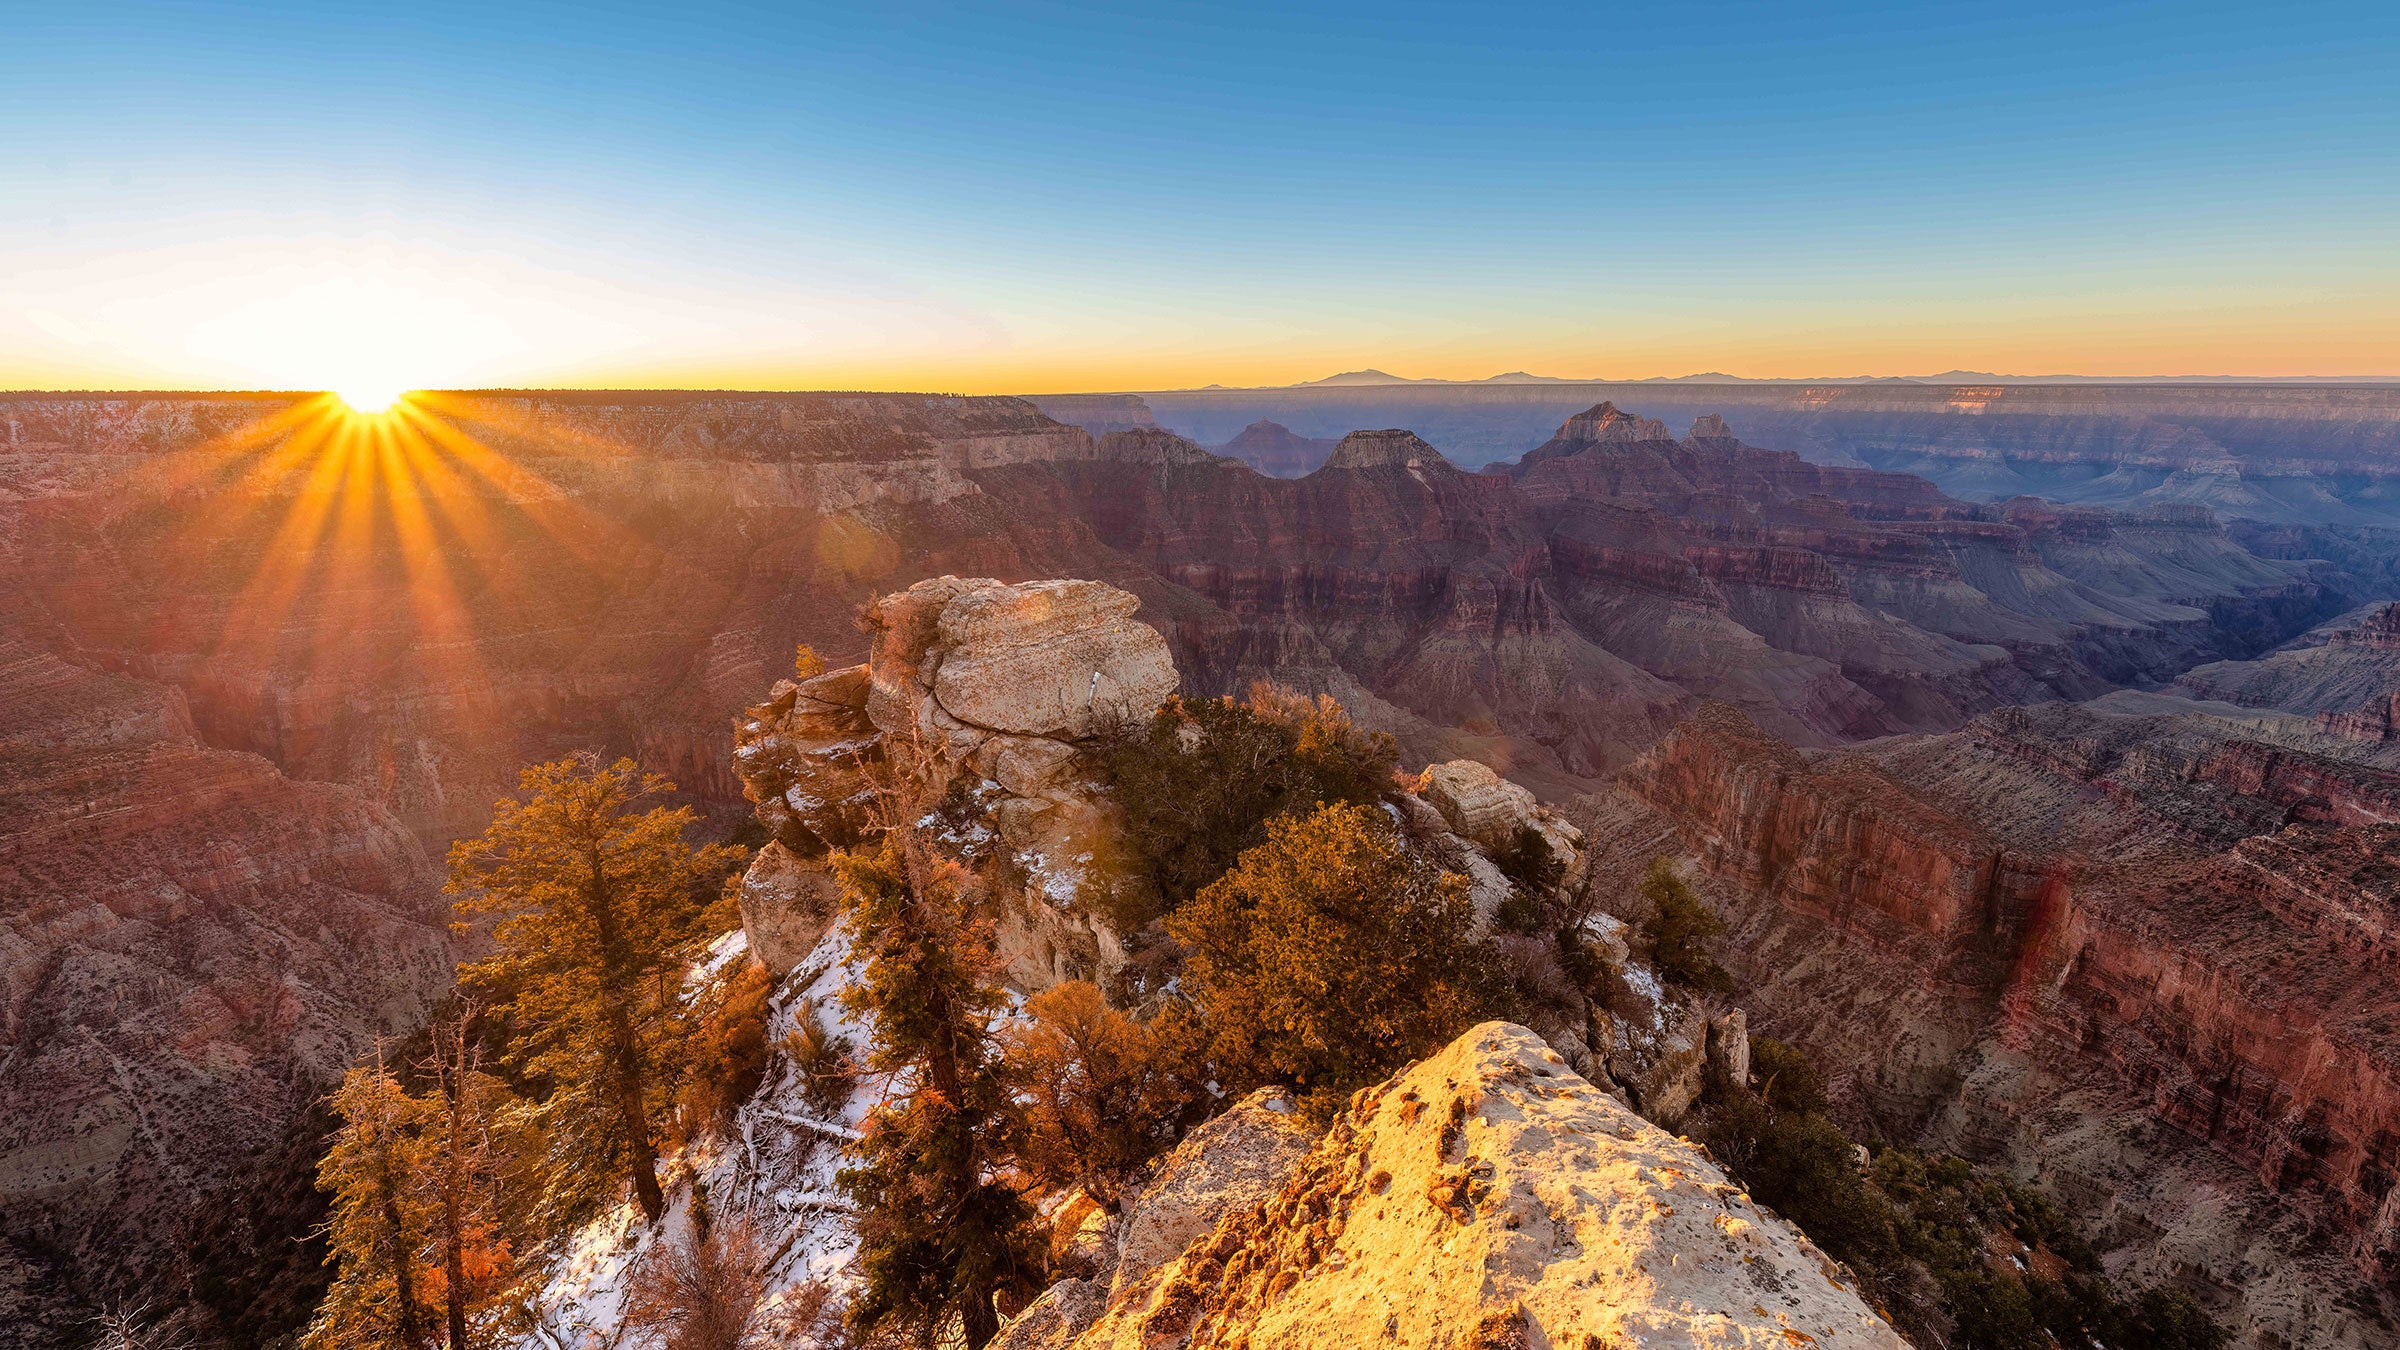
Sunrise at the Grand Canyon's North Rim (Photo: Danielle Hanusek)
Southwestern Utah and northern Arizona are a photographer’s paradise. From weird and wonderful rock formations set aglow by the rising sun to the Milky Way arching over canyons, you’ll need to pack extra batteries because it’ll be hard to stop clicking that shutter button. We’ve compiled our favorite photography itinerary that hits three of the area’s most incredible national parks, along with tips from our friends at Tamron on how to capture the beauty of Grand Canyon, Zion and Bryce Canyon. Take two to three days to photograph these parks at their best, and basecamp out of Kanab, Utah for the easiest access.
Sunrise at Grand Canyon’s North Rim

Jutting out into the massive canyon below, standing at Bright Angel Point allows you to watch as the rising sun highlights the different bands of color in the Grand Canyon below. The closest major town to the park’s North Rim is Kanab, an hour and 40 minute drive. It’s best to stay at the Grand Canyon Lodge or North Rim Campground on your first night to avoid a really early wake up call. The hike from the lodge to the point is 0.5 miles on a flat, paved trail. Allow yourself at least 30 minutes for the hike and plan to arrive 45 minutes before sunrise to give yourself time to set up and capture all the stages of dawn before the sun finally appears. Be sure to bring a headlamp and give the canyon rim a wide berth in the dark to avoid a dangerous slip.
Tamron Tips: Clean the front element of your lens when shooting into the rising sun. If there’s dirt or dust on your front element, you might end up with lens flares in your image. Sunrise is usually a high contrast situation, so be sure to expose for the highlights to maintain detail. To create a starburst effect with the rising sun, stop down your aperture to F/16 or F/22 and wait until the sun just crests the horizon. A wide-angle zoom lens like the Tamron 17-50mm F/4 Di III VXD or the 28-200mm F/2.8-5.6 Di III RXD is a great choice for both sunrise and sunset.
Sunset at Zion’s Watchman

One of the most iconic views in Zion is the majestic peak called the Watchman looming over the Virgin River. Easily accessible from the road, this location is a great spot to take in the setting sun, alighting the surrounding canyons and peaks in a warm glow. Head to the intersection of Zion Scenic Canyon Drive and Zion-Mount Carmel Highway and set your tripod up on the bridge over the river. This is a popular sunset spot, so plan to arrive 45 minutes before sundown to ensure you have enough time to get situated and find a good vantage point.
ADVERTISEMENT
Be sure to stick around after the sun sets and the colors begin to fade for blue hour. This time of day is just before sunrise or just after sunset when a beautiful blue tint envelopes the landscape. It’s a great time to take photos.
Tamron Tips: When shooting sunset, set your aperture to F/16 or F/22 to maximize your depth of field. If you’re using a tripod, use the lowest ISO to maximize quality. If you’re hand-holding, set your ISO to the lowest value that allows a fast enough shutter speed to get a clear image.
Night Photography in Zion

When the sun goes down, the crowds disappear at Utah’s most-visited national park. While you’re waiting for the Milky Way to rise, start on the park’s east side. The area surrounding Checkerboard Mesa makes for a great, semi-flat spot to set up your tripod to take photos of the stars. Make sure to bring a headlamp equipped with a red light to help preserve your night vision for the walk to wherever you choose to set up. Heading west on Hwy. 9, look for a lone pine tree growing out of a rock formation. It will be on the left-hand side of the road before you get to the Zion-Mount Carmel Tunnel. This often-photographed tree is a great subject to try light painting on. When the Milky Way rises, head back to the bridge in front of the Watchman to capture the galaxy.
ADVERTISEMENT
Tamron Tips: A fast aperture, ultra wide-angle lens like a Tamron 17-28mm F/2.8 for full-frame or 11-20mm F/2.8 for crop-sensor is best for night photography. Settings will vary based on conditions, but you’ll likely want to shoot at F/2.8 at an ISO between 1600-6400 and a shutter speed between 10 and 30 seconds. Be sure to have a stable tripod and shutter release or remote timer so you don’t shake your camera while taking a long exposure, and turn off your lens’ image stabilization.
You’ll likely need to manually focus as your auto-focus won’t be effective in the dark. Use the magnifier on your camera’s LCD screen to enlarge a bright star or planet, then move your focus ring back and forth until the point of light is sharp. Zoom in on your first few images to make sure the stars are sharp. You can use a piece of tape to secure the focus ring, so you don’t accidentally bump it out of focus.
Sunrise at Bryce Canyon’s Amphitheater

Sunrise is one of the prettiest times at Bryce Canyon, with the warm morning sun lighting up the hoodoos across the spectrum from white to pink to orange. While many of the viewpoints along Bryce Canyon Scenic Drive offer a brilliant show at dawn, the aptly named Sunrise Point is one of the best. The point is a short walk from the parking area and there are many spots along the rim to set up, or the option to hike down the Queen’s Garden Trail a bit to get a perspective immersed inside the hoodoos. Arrive 45 minutes before sunrise and in addition to a headlamp, bring thin gloves, a jacket and a warm hat as Bryce Canyon’s relatively high elevation makes it much colder than the surrounding desert, especially at dawn.
These tips were sponsored by Tamron. Learn more and find your perfect camera lens at tamron-americas.com.